单台服务器扛不住了?Nginx反向代理与负载均衡配置实战

业务量上来之后,一台机器扛不住是迟早的事。加机器不难,难的是流量怎么分过去、挂了怎么切走、会话怎么保持。Nginx做反向代理和负载均衡是业界标配,但很多人只会抄个proxy_pass的配置,真正出问题的时候抓瞎。
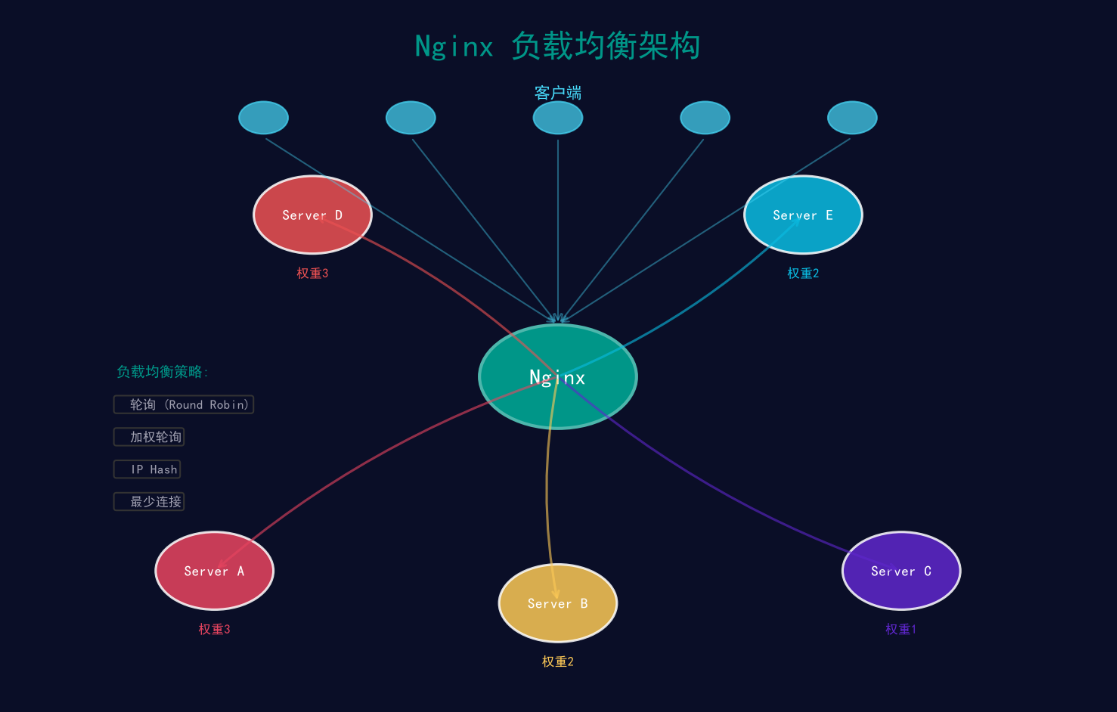
四种负载均衡策略
Nginx的upstream模块自带四种分发策略,适用场景各不相同。
| 策略 | 配置方式 | 特点 | 适用场景 |
|---|---|---|---|
| 轮询 | 默认,不写 | 依次分发 | 后端机器配置相同 |
| 加权轮询 | weight=N | 按权重比例分发 | 机器配置不同 |
| IP Hash | ip_hash | 同IP固定到同一台 | 需要会话保持 |
| 最少连接 | least_conn | 优先分给连接数少的 | 长连接场景 |
基础配置长这样:
upstream backend {
    # 加权轮询
    server 10.0.1.10:8080 weight=3;
    server 10.0.1.11:8080 weight=2;
    server 10.0.1.12:8080 weight=1;

    # 或者用最少连接
    # least_conn;

    # 或者用IP Hash
    # ip_hash;
}

server {
    listen 80;
    server_name api.example.com;

    location / {
        proxy_pass http://backend;
    }
}
加权轮询的权重是按比例算的。weight=3、2、1,总权重6,那第一台分到50%的流量,第二台33%,第三台17%。配置不同的机器给不同的权重,让性能好的多扛一点。
反向代理完整配置
proxy_pass光写一个地址不够,生产环境要配一堆参数:
server {
    listen 80;
    server_name api.example.com;

    location /api/ {
        proxy_pass http://backend;

        # 传递真实客户端信息
        proxy_set_header Host $host;
        proxy_set_header X-Real-IP $remote_addr;
        proxy_set_header X-Forwarded-For $proxy_add_x_forwarded_for;
        proxy_set_header X-Forwarded-Proto $scheme;

        # 连接超时配置
        proxy_connect_timeout 5s;    # 连接后端超时
        proxy_send_timeout 30s;      # 发送请求超时
        proxy_read_timeout 30s;      # 读取响应超时

        # 缓冲区配置
        proxy_buffering on;
        proxy_buffer_size 16k;
        proxy_buffers 8 16k;
        proxy_busy_buffers_size 32k;

        # 错误重试
        proxy_next_upstream error timeout http_502 http_503 http_504;
        proxy_next_upstream_tries 3;
        proxy_next_upstream_timeout 10s;
    }
}
每个参数说一下为什么这么配。
proxy_set_header那几行是把客户端的真实IP和协议传给后端。不传的话后端拿到的remote_addr全是Nginx的内网IP,日志和风控都废了。
proxy_connect_timeout设5秒,连接都建不起来说明后端挂了,没必要等太久。proxy_read_timeout设30秒,这个要看业务,如果你的接口有慢查询可能要调大。
proxy_next_upstream很关键,遇到error、timeout、502、503、504的时候自动重试下一台。tries 3是最多重试3次,timeout 10s是总重试时间不超过10秒。这样某台后端挂了,用户请求会自动转到其他机器,基本无感知。
健康检查与故障转移
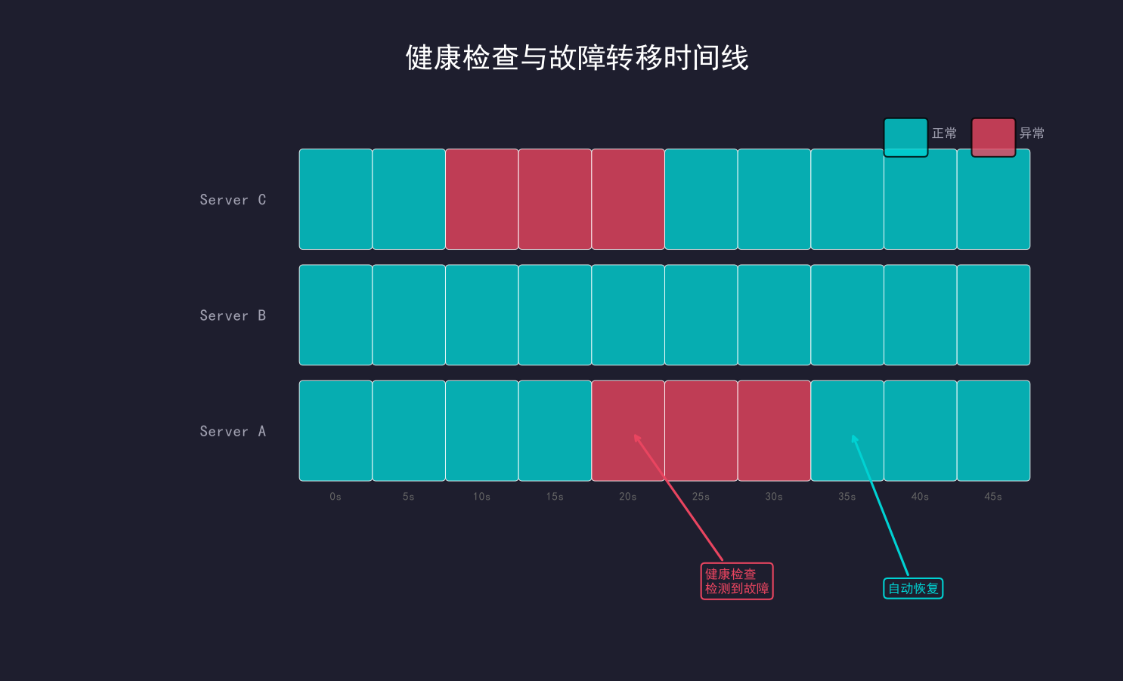
Nginx开源版没有主动健康检查,只有被动检查。被动检查就是请求失败了标记为不可用,过一段时间再试。
upstream backend {
    server 10.0.1.10:8080 max_fails=3 fail_timeout=30s;
    server 10.0.1.11:8080 max_fails=3 fail_timeout=30s;
    server 10.0.1.12:8080 max_fails=3 fail_timeout=30s;
}
max_fails=3表示3次失败就标记为不可用,fail_timeout=30s表示30秒内不再往这台发请求。30秒后会试探性地发一个请求过去,成功了就恢复。
被动检查有个问题,如果某台机器挂了但没人请求它,Nginx不知道它挂了。要主动探测得用商业版的health_check指令,或者用第三方模块nginx_upstream_check_module。
不想折腾模块的话,用个脚本配合Nginx的API来做主动检查:
#!/bin/bash
# health_check.sh - 主动健康检查脚本
BACKENDS=("10.0.1.10:8080" "10.0.1.11:8080" "10.0.1.12:8080")
NGINX_CONF="/etc/nginx/conf.d/upstream.conf"

for backend in "${BACKENDS[@]}"; do
    if curl -sf -o /dev/null --max-time 2 "http://${backend}/health"; then
        # 健康,确保upstream里有这台
        echo "${backend} is UP"
    else
        # 不健康,从upstream里摘掉
        echo "${backend} is DOWN"
        # 通过Nginx API动态摘除(需要nginx-plus或lua模块)
    fi
done
更实用的方案是用Consul做服务发现,Nginx配合consul-template动态生成upstream配置:
# 由consul-template生成
upstream backend {
    {{range services "api"}}
    server {{.Address}}:{{.Port}} max_fails=3 fail_timeout=10s;
    {{end}}
}
Consul挂了服务自动从列表里消失,恢复了自动加回来,比手动改配置靠谱多了。
会话保持
有些场景需要把同一个用户的请求始终路由到同一台后端,比如用了本地Session的服务、或者有状态缓存。
方案一:IP Hash
upstream backend {
    ip_hash;
    server 10.0.1.10:8080;
    server 10.0.1.11:8080;
    server 10.0.1.12:8080;
}
同一个客户端IP会固定到同一台后端。简单粗暴,但有问题:如果客户端走NAT出去,同一个公司几百人同一个IP,全打到一台机器上了。
方案二:Cookie Hash
用sticky cookie模块(需要nginx-sticky-module):
upstream backend {
    sticky cookie srv_id expires=1h domain=.example.com path=/;
    server 10.0.1.10:8080;
    server 10.0.1.11:8080;
    server 10.0.1.12:8080;
}
第一次请求Nginx随机选一台,在响应里种一个cookie记录是哪台。后续请求带着cookie来,Nginx就路由到同一台。比IP Hash精确得多。
方案三:无状态化
最好的方案是把Session放到Redis里,后端无状态,随便路由到哪台都行。这就不需要会话保持了。能用这个方案就别用前两个。
SSL卸载
让Nginx处理HTTPS,后端用HTTP,减轻后端的加解密负担:
server {
    listen 443 ssl http2;
    server_name api.example.com;

    ssl_certificate /etc/nginx/ssl/cert.pem;
    ssl_certificate_key /etc/nginx/ssl/key.pem;
    ssl_protocols TLSv1.2 TLSv1.3;
    ssl_ciphers HIGH:!aNULL:!MD5;
    ssl_session_cache shared:SSL:10m;
    ssl_session_timeout 10m;

    location /api/ {
        proxy_pass http://backend;
        proxy_set_header X-Forwarded-Proto https;
        # 其他proxy配置...
    }
}

# HTTP跳转HTTPS
server {
    listen 80;
    server_name api.example.com;
    return 301 https://$server_name$request_uri;
}
ssl_session_cache开启session复用,同一个客户端的后续TLS连接不用重新握手,能省不少CPU。shared:SSL:10m表示所有worker共享10MB的session缓存。
限流保护
Nginx自带限流模块,保护后端不被打爆:
# 定义限流区域
limit_req_zone $binary_remote_addr zone=api_limit:10m rate=100r/s;
limit_conn_zone $binary_remote_addr zone=conn_limit:10m;

server {
    location /api/ {
        # 请求限流:每秒100个请求,突发允许10个
        limit_req zone=api_limit burst=10 nodelay;

        # 并发连接限流:每个IP最多50个并发连接
        limit_conn conn_limit 50;

        proxy_pass http://backend;
    }
}
| 参数 | 含义 | 调优建议 |
|---|---|---|
| rate=100r/s | 每秒允许100个请求 | 按后端QPS容量设 |
| burst=10 | 允许突发10个 | 别太大,否则限流失效 |
| nodelay | 突发请求不延迟 | 要排队就去掉nodelay |
| limit_conn 50 | 单IP最多50并发 | 防止单个IP占满连接 |
限流命中了返回503。如果想自定义返回内容:
limit_req_status 429;
error_page 429 = @too_many_requests;

location @too_many_requests {
    default_type application/json;
    return 429 '{"code":429,"message":"请求太频繁了,稍后再试"}';
}
性能调优
几个关键参数,对吞吐量影响很大:
# nginx.conf 全局配置
worker_processes auto;        # 自动按CPU核数
worker_rlimit_nofile 65535;   # 每个worker最大文件描述符

events {
    worker_connections 16384;  # 每个worker最大连接数
    use epoll;                 # Linux用epoll
    multi_accept on;           # 一次accept多个连接
}

http {
    sendfile on;              # 零拷贝发送
    tcp_nopush on;            # 等数据包满了再发
    tcp_nodelay on;           # 禁用Nagle算法
    keepalive_timeout 65s;    # 客户端keep-alive超时
    keepalive_requests 1000;  # 一个keep-alive最多处理1000个请求

    # 后端keep-alive
    upstream backend {
        server 10.0.1.10:8080;
        keepalive 32;  # 到后端保持32个空闲连接
    }

    server {
        location /api/ {
            proxy_pass http://backend;
            proxy_http_version 1.1;           # 用HTTP/1.1才能复用连接
            proxy_set_header Connection "";   # 清掉Connection头,启用keep-alive
        }
    }
}
keepalive 32这个参数很多人漏掉。没配的话Nginx每次请求都跟后端新建TCP连接,三次握手开销不小。配了之后Nginx和后端之间保持32个空闲长连接,请求直接复用。
proxy_http_version 1.1和proxy_set_header Connection ""是启用后端keep-alive的必要配置,缺一个都不行。
算一下最大连接数:worker_processes * worker_connections。4核CPU配4个worker,每个16384连接,总共65536。够大部分场景了。如果不够,调worker_connections,但记得同时调worker_rlimit_nofile和系统ulimit。
日志配置
访问日志别用默认格式,加上响应时间和upstream信息:
log_format main '$remote_addr - $remote_user [$time_local] '
                '"$request" $status $body_bytes_sent '
                '"$http_referer" "$http_user_agent" '
                'rt=$request_time uct=$upstream_connect_time '
                'uht=$upstream_header_time urt=$upstream_response_time '
                'upstream=$upstream_addr';

access_log /var/log/nginx/access.log main;
| 字段 | 含义 | 排查用途 |
|---|---|---|
| $request_time | 总请求时间 | 慢请求排查 |
| $upstream_connect_time | 连接后端耗时 | 后端是否连不上 |
| $upstream_header_time | 收到响应头耗时 | 后端处理慢还是传输慢 |
| $upstream_response_time | 收完响应体耗时 | 大响应体传输慢 |
| $upstream_addr | 请求分到了哪台后端 | 排查某台后端问题 |
$request_time减去$upstream_response_time就是Nginx自身耗时,如果这个差值很大说明Nginx在等后端或者Nginx自己有问题。
一个完整的配置模板
把上面的东西合到一起:
# /etc/nginx/conf.d/api.conf

upstream api_backend {
    least_conn;
    server 10.0.1.10:8080 weight=3 max_fails=3 fail_timeout=30s;
    server 10.0.1.11:8080 weight=2 max_fails=3 fail_timeout=30s;
    server 10.0.1.12:8080 weight=1 max_fails=3 fail_timeout=30s;
    keepalive 32;
}

server {
    listen 443 ssl http2;
    server_name api.example.com;

    ssl_certificate /etc/nginx/ssl/cert.pem;
    ssl_certificate_key /etc/nginx/ssl/key.pem;
    ssl_protocols TLSv1.2 TLSv1.3;
    ssl_session_cache shared:SSL:10m;
    ssl_session_timeout 10m;

    limit_req_zone $binary_remote_addr zone=api:10m rate=200r/s;

    location /api/ {
        limit_req zone=api burst=20 nodelay;

        proxy_pass http://api_backend;
        proxy_http_version 1.1;
        proxy_set_header Connection "";
        proxy_set_header Host $host;
        proxy_set_header X-Real-IP $remote_addr;
        proxy_set_header X-Forwarded-For $proxy_add_x_forwarded_for;
        proxy_set_header X-Forwarded-Proto https;

        proxy_connect_timeout 5s;
        proxy_send_timeout 30s;
        proxy_read_timeout 30s;

        proxy_buffering on;
        proxy_buffer_size 16k;
        proxy_buffers 8 16k;

        proxy_next_upstream error timeout http_502 http_503 http_504;
        proxy_next_upstream_tries 3;
        proxy_next_upstream_timeout 10s;
    }

    location /health {
        access_log off;
        return 200 'ok';
    }
}
改完配置记得先test再reload:
nginx -t && nginx -s reload
nginx -t检查语法,没问题再reload。直接reload万一配置有错,Nginx可能起不来。
验证负载均衡效果
配好了得验证流量是不是真的均匀分了。用ab压一下:
ab -n 1000 -c 10 http://api.example.com/api/test
然后看各后端的访问日志条数,应该大致按权重比例。如果某台明显偏少,检查max_fails是不是把它标记为不可用了。
也可以用Nginx的stub_status看实时连接数:
location /nginx_status {
    stub_status on;
    access_log off;
    allow 10.0.0.0/8;
    deny all;
}
访问/nginx_status会看到:
Active connections: 15
server accepts handled requests
 8456 8456 32891
Reading: 0 Writing: 1 Waiting: 14
Active connections是当前活跃连接数,Waiting是空闲等待中的keep-alive连接。如果Waiting很高说明keep-alive在工作,好现象。
总结
Nginx负载均衡看着简单,proxy_pass一行就能跑,但生产环境要考虑的东西不少。超时配短了导致正常请求被切断,重试配多了把后端打雪崩,限流配高了形同虚设。上面那些参数都是踩过坑之后总结出来的,拿去改改就能用。
最值得花时间的是健康检查和故障转移那块。后端挂了Nginx能不能自动摘掉、恢复能不能自动加回来,这决定了你的服务可用性能到几个9。被动检查够用就用被动,不够就上Consul或者Nginx Plus的主动检查。

- 点赞
- 收藏
- 关注作者
评论(0)