【JavaWeb项目】——外卖订餐系统之商家添加餐品、修改餐品、查询热卖餐品、查询出售车、进行发货操作

举报
Y小夜 发表于 2024/12/05 22:17:24 2024/12/05
【摘要】 ​🎯添加商品😎前端页面addFood.jsp页面🎈代码<%-- Created by IntelliJ IDEA. User: Lenovo Date: 19/6/2024 Time: 下午3:06 To change this template use File | Settings | File Templates.--%><%@ page contentType="te...

🎯添加商品

😎前端页面addFood.jsp页面

🎈代码

<%--
  Created by IntelliJ IDEA.
  User: Lenovo
  Date: 19/6/2024
  Time: 下午3:06
  To change this template use File | Settings | File Templates.
--%>
<%@ page contentType="text/html;charset=UTF-8" language="java" %>
<%@taglib prefix="c" uri="http://java.sun.com/jsp/jstl/core" %>
<html>
<head>
    <title>添加餐品</title>
    <%--    引入Bootstrap--%>
    <link href="https://cdn.staticfile.org/twitter-bootstrap/3.3.7/css/bootstrap.min.css" rel="stylesheet">
    <link href="../css/addFood.css" rel="stylesheet" type="text/css">
</head>
<body>
    <div class="main">
        <div class="first">优选外卖订餐系统</div>
<%--        获取绝对路径,加上绝对路径--%>
        <form action="${pageContext .request.contextPath}/addFoodServlet" role="form">
            <div class="form-group">
                <label>餐品名称:</label>
                <input type="text" name="fname" class="form-control" placeholder="请输入餐品名称">
            </div>
            <div  class="form-group">
                <label>购买人数:</label>
                <input type="text" name="fcount"  class="form-control" placeholder="请输入购买人数">
            </div>
            <div class="form-group">
                <label>价格:</label>
                <input type="text" name="fprice" class="form-control" placeholder="请输入价格">
            </div >
            <div class="one">
                <button type="submit" class="btn btn-info btn-lg">提交</button>
                <button type="reset" class="btn btn-default btn-lg">重置</button>
            </div>
        </form>
    </div>
</body>
</html>

🎈解析

        这段代码是一个JSP页面,用于创建一个添加餐品的表单。以下是对代码的详细解析:

  1. JSP注释:

    • 页面顶部的注释由IntelliJ IDEA自动生成,提供了创建者、日期和时间。
  2. 页面指令:

    • <%@ page contentType="text/html;charset=UTF-8" language="java" %>: 设置页面的MIME类型为HTML,字符集为UTF-8,脚本语言为Java。
    • <%@taglib prefix="c" uri="http://java.sun.com/jsp/jstl/core" %>: 引入JSTL核心库,使用c作为前缀。
  3. HTML结构:

    • <html>: 根元素。
    • <head>: 包含页面的元数据,如标题和样式链接。
    • <title>: 页面标题为“添加餐品”。
  4. Bootstrap和自定义CSS:

    • <link href="https://cdn.staticfile.org/twitter-bootstrap/3.3.7/css/bootstrap.min.css" rel="stylesheet">: 引入Bootstrap的CSS文件,用于页面样式。
    • <link href="../css/addFood.css" rel="stylesheet" type="text/css">: 引入自定义的CSS样式文件。
  5. 表单:

    • <form action="${pageContext.request.contextPath}/addFoodServlet" role="form">: 创建一个表单,用于提交添加餐品的信息。
      • action属性设置表单提交的URL,使用了JSP表达式${pageContext.request.contextPath}来动态设置上下文路径。
  6. 表单控件:

    • <div class="form-group">: 包含表单控件的布局。
    • <label>: 表示表单控件的说明文字。
    • <input type="text" name="..." class="form-control" placeholder="...">: 创建文本输入字段,用于输入餐品名称、购买人数和价格。
  7. 按钮:

    • <button type="submit" class="btn btn-info btn-lg">提交</button>: 创建提交按钮,使用Bootstrap的按钮样式。
    • <button type="reset" class="btn btn-default btn-lg">重置</button>: 创建重置按钮,用于清空表单输入。
  8. Bootstrap类:

    • 页面使用了Bootstrap的类(如form-groupform-controlbtnbtn-infobtn-lgbtn-default)来增强表单的布局和样式。
  9. 表单提交和重置:

    • 用户填写完表单后,可以点击“提交”按钮将表单数据发送到服务器的addFoodServlet进行处理,或者点击“重置”按钮清空表单。

        这个JSP页面提供了一个简洁的用户界面,允许用户输入餐品的相关信息并提交,或者重置表单。使用Bootstrap框架增强了用户界面的友好性和响应性。

🎈效果

😎后端处理AddFoodServlet部分

🎈代码

package com.dingcan.controller;

import com.dingcan.service.FoodService;
import com.dingcan.service.Impl.FoodServiceImpl;
import com.dingcan.service.Impl.ShangServiceImpl;
import com.dingcan.service.ShangService;

import javax.servlet.ServletException;
import javax.servlet.annotation.WebServlet;
import javax.servlet.http.HttpServlet;
import javax.servlet.http.HttpServletRequest;
import javax.servlet.http.HttpServletResponse;
import java.io.IOException;

@WebServlet(name = "AddFoodServelt", value = "/addFoodServlet")
public class AddFoodServlet extends HttpServlet {
    FoodService foodService=new FoodServiceImpl();
    ShangService shangService=new ShangServiceImpl();
    @Override
    protected void service(HttpServletRequest req, HttpServletResponse resp) throws ServletException, IOException {
        //得到session中的里的sid1
        int sid1=(int)req.getSession().getAttribute("sid1");
        //获得请求参数
        String fname=req.getParameter("fname");
        int fcount=Integer.parseInt(req.getParameter("fcount"));
        int fprice=Integer.parseInt(req.getParameter("fprice"));
        int fdianid=shangService.FindSdianid(sid1);
        //添加到数据库中
        if(foodService.addFood(fname,fcount,fprice,fdianid)){
            //添加成功
            resp.sendRedirect("showFoodServlet");
        }else{
            //添加失败
            resp.sendRedirect("fail.jsp");
        }
    }
}

🎈解析

        这段Java代码是一个Servlet控制器,用于处理添加餐品的请求:

  1. 包声明:

    • package com.dingcan.controller;: 声明了这个类属于com.dingcan.controller包。
  2. 导入服务类:

    • 导入了FoodService接口及其实现类FoodServiceImpl,以及ShangService接口及其实现类ShangServiceImpl
  3. @WebServlet注解:

    • @WebServlet(name = "AddFoodServelt", value = "/addFoodServlet"): 注解用于注册Servlet,定义了它的名称和URL映射。存在一个拼写错误,应该是AddFoodServlet而不是AddFoodServelt
  4. 类定义:

    • public class AddFoodServlet extends HttpServlet: 定义了一个名为AddFoodServlet的类,它继承自HttpServlet
  5. 成员变量:

    • FoodService foodService = new FoodServiceImpl();: 创建了FoodService接口的实现类FoodServiceImpl的实例。
    • ShangService shangService = new ShangServiceImpl();: 创建了ShangService接口的实现类ShangServiceImpl的实例。
  6. service方法:

    • @Override: 表示重写了父类的方法。
    • protected void service(HttpServletRequest req, HttpServletResponse resp): 这是Servlet的service方法,用于处理客户端的请求。
  7. 获取会话属性:

    • int sid1 = (int) req.getSession().getAttribute("sid1");: 从会话中获取sid1属性,该属性可能表示商家的ID。
  8. 获取请求参数:

    • 从请求中获取餐品名称(fname)、购买人数(fcount)和价格(fprice),并转换为适当的数据类型。
  9. 获取商家ID:

    • int fdianid = shangService.FindSdianid(sid1);: 使用ShangServiceFindSdianid方法根据sid1获取商家的ID。
  10. 添加餐品到数据库:

    • if (foodService.addFood(fname, fcount, fprice, fdianid)): 调用FoodServiceaddFood方法尝试添加餐品到数据库。
  11. 重定向:

    • 如果添加成功,使用resp.sendRedirect("showFoodServlet")重定向到showFoodServlet
    • 如果添加失败,使用resp.sendRedirect("fail.jsp")重定向到错误页面。
  12. 异常处理:

    • 方法声明中包含了throws ServletException, IOException,表示这个方法可能会抛出ServletExceptionIOException异常。

        AddFoodServlet的作用是接收用户提交的餐品信息,使用服务层添加到数据库,并根据操作结果重定向到相应页面。这个过程中,它利用了会话管理来获取商家ID,并与用户提交的餐品信息一起存储到数据库中。

🎯修改餐品信息

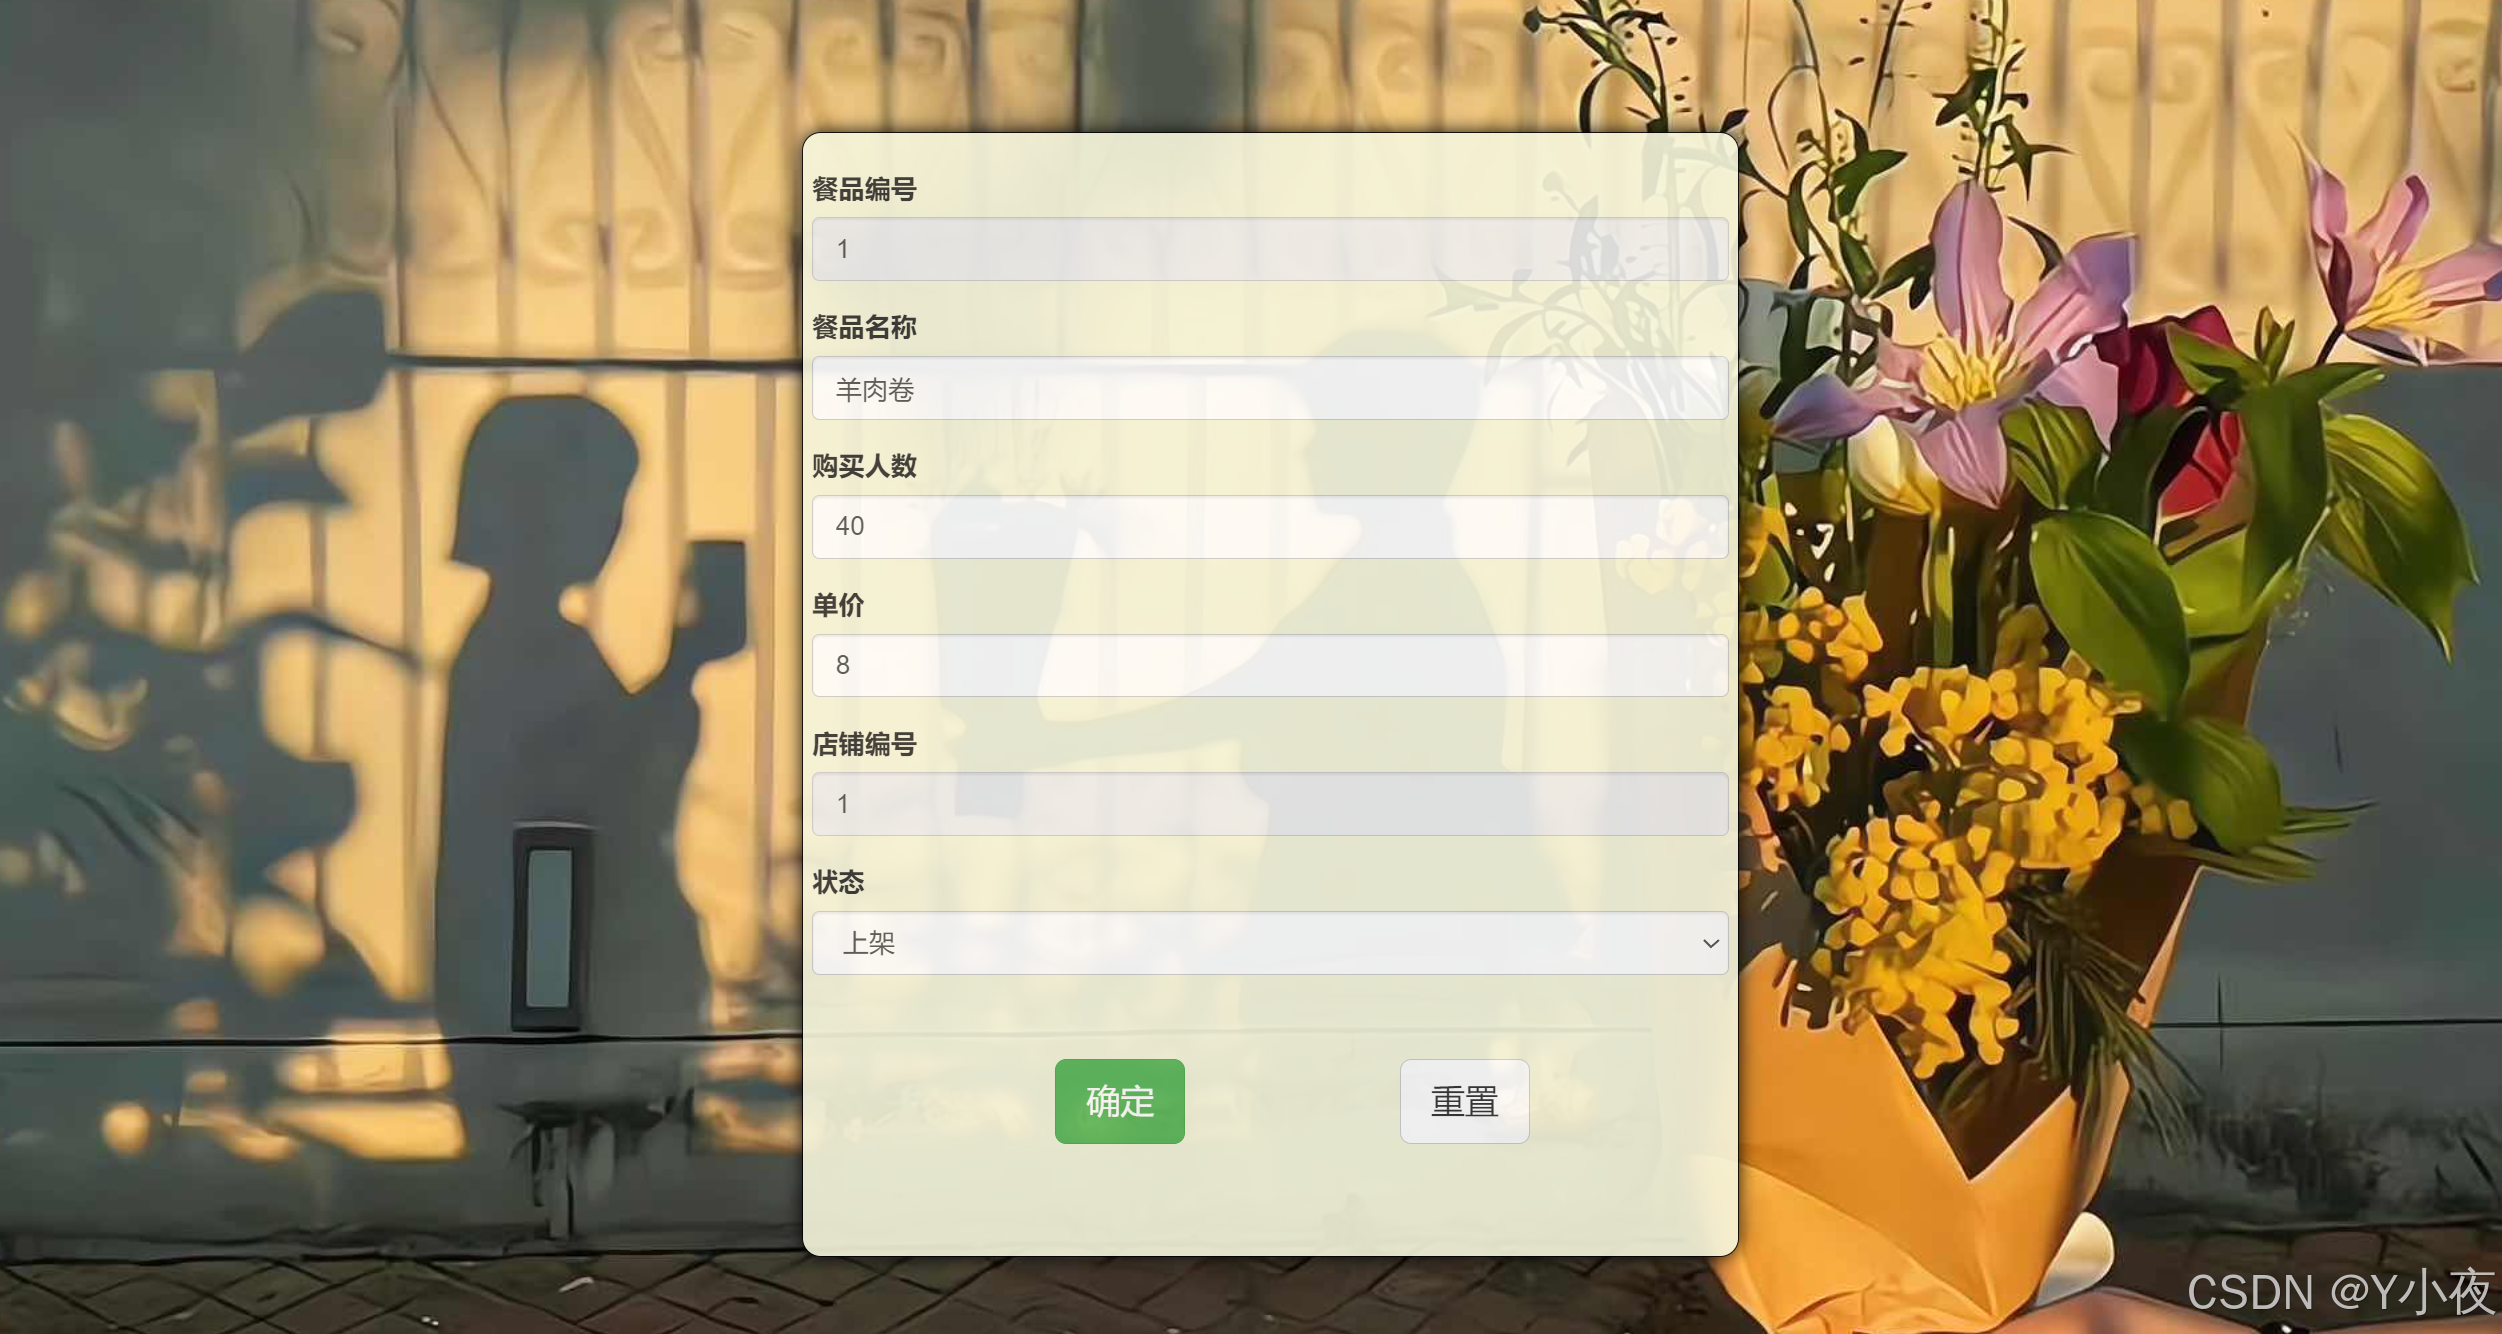
😎前端页面updateFood1.jsp部分

🎈代码

<%--
  Created by IntelliJ IDEA.
  User: Lenovo
  Date: 18/6/2024
  Time: 下午7:59
  To change this template use File | Settings | File Templates.
--%>
<%@ page contentType="text/html;charset=UTF-8" language="java" %>
<%@taglib prefix="c" uri="http://java.sun.com/jsp/jstl/core" %>
<html>
<head>
    <title>操作房源信息</title>
    <!-- 引入 Bootstrap -->
    <link href="https://cdn.staticfile.org/twitter-bootstrap/3.3.7/css/bootstrap.min.css" rel="stylesheet">
    <link href="${pageContext.request.contextPath}/css/updateFood.css" rel="stylesheet" type="text/css">
</head>
<body>
<div id="main">
    <form action="updateFoodServlet" class="form-horizontal" role="form">
        <div class="form-group">
            <label >餐品编号</label>
            <input type="text"  readonly value="${food.fid}" name="fid" class="form-control">
        </div>
        <div class="form-group">
            <label >餐品名称</label>
            <input type="text" class="form-control" value="${food.fname}" name="fname" placeholder="请输入房源名称">
        </div>
        <div class="form-group">
            <label >购买人数</label>
            <input type="text" class="form-control" value="${food.fcount}" name="fcount" placeholder="请输入浏览人数">
        </div>
        <div class="form-group">
            <label >单价</label>
            <input type="text" class="form-control" value="${food.fprice}" name="fprice" placeholder="请输入浏览人数">
        </div>
        <div class="form-group">
            <label>店铺编号</label>
            <input type="text" readonly class="form-control" value="${food.fdianid}" name="fdianid" >
        </div>
        <div class="form-group">
            <label >状态</label>
            <select name="fstate"  class="form-control">
                <option value="1" ${food.fstate==1?'selected':''}>上架</option>
                <option value="0" ${food.fstate==0?'selected':''}>下架</option>
            </select>
        </div>
        <button type="submit" class="btn btn-success btn-lg">确定</button>
        <button type="reset" class="btn btn-default btn-lg">重置</button>
    </form>
</div>
</body>
</html>

🎈解释

这段代码是一个JSP页面,用于展示和更新餐品信息的表单:

  1. JSP注释:

    • 页面顶部的注释由IntelliJ IDEA自动生成,提供了创建者、日期和时间。
  2. 页面指令:

    • <%@ page contentType="text/html;charset=UTF-8" language="java" %>: 设置页面的MIME类型为HTML,字符集为UTF-8,脚本语言为Java。
    • <%@taglib prefix="c" uri="http://java.sun.com/jsp/jstl/core" %>: 引入JSTL核心库,使用c作为前缀。
  3. HTML结构:

    • <html>: 根元素。
    • <head>: 包含页面的元数据,如标题和样式链接。
    • <title>: 页面标题为“操作房源信息”。
  4. Bootstrap和自定义CSS:

    • <link href="https://cdn.staticfile.org/twitter-bootstrap/3.3.7/css/bootstrap.min.css" rel="stylesheet">: 引入Bootstrap的CSS文件,用于页面样式。
    • <link href="${pageContext.request.contextPath}/css/updateFood.css" rel="stylesheet" type="text/css">: 动态引入自定义的CSS样式文件,路径通过JSP表达式构建。
  5. 表单:

    • <form action="updateFoodServlet" class="form-horizontal" role="form">: 创建一个水平布局的表单,用于提交更新餐品信息。
      • action属性设置表单提交的URL为updateFoodServlet
  6. 表单控件:

    • <div class="form-group">: 包含表单控件的布局。
    • <label>: 表示表单控件的说明文字。
    • <input>: 创建输入字段,用于展示和编辑餐品信息。readonly属性用于创建只读字段,用户不能修改。
  7. JSP表达式:

    • ${food.fid}${food.fname}${food.fcount}${food.fprice}, 和 ${food.fdianid}: 这些JSP表达式用于从页面传递的food对象中获取相应的属性值。
  8. 下拉选择框:

    • <select name="fstate" class="form-control">: 创建一个下拉选择框,用于选择餐品的上架或下架状态。
    • ${food.fstate==1?'selected':''} 和 ${food.fstate==0?'selected':''}: 使用JSP表达式来设置默认选中的选项。
  9. 按钮:

    • <button type="submit" class="btn btn-success btn-lg">确定</button>: 创建提交按钮,使用Bootstrap的按钮样式。
    • <button type="reset" class="btn btn-default btn-lg">重置</button>: 创建重置按钮,用于清空表单输入。
  10. Bootstrap类:

    • 页面使用了Bootstrap的类(如form-horizontalform-groupform-controlbtnbtn-successbtn-lgbtn-default)来增强表单的布局和样式。

        这个JSP页面提供了一个表单,允许用户更新餐品的编号、名称、购买人数、单价、店铺编号和状态。使用Bootstrap框架增强了用户界面的友好性和响应性。表单数据提交到updateFoodServlet进行处理。

🎈效果

😎后端处理UpdateFoodServlet部分

🎈代码

package com.dingcan.controller;

import com.dingcan.service.FoodService;
import com.dingcan.service.Impl.FoodServiceImpl;

import javax.servlet.ServletException;
import javax.servlet.annotation.WebServlet;
import javax.servlet.http.HttpServlet;
import javax.servlet.http.HttpServletRequest;
import javax.servlet.http.HttpServletResponse;
import java.io.IOException;


@WebServlet (name = "UpdateFoodServlet",value = "/updateFoodServlet")
public class UpdateFoodServlet extends HttpServlet {
    @Override
    protected void service(HttpServletRequest req, HttpServletResponse resp) throws ServletException, IOException {
        int fid= Integer.parseInt(req.getParameter("fid"));
        String fname=req.getParameter("fname");
        int fcount=Integer.parseInt(req.getParameter("fcount"));
        int fprice=Integer.parseInt(req.getParameter("fprice"));
        int fdianid=Integer.parseInt(req.getParameter("fdianid"));
        int fstate=Integer.parseInt(req.getParameter("fstate"));
        //更新数据库
        FoodService foodService=new FoodServiceImpl();
        boolean b = foodService.updateFood(fid, fname, fcount, fprice, fdianid, fstate);
        if(b){
            resp.sendRedirect("showFoodServlet");
        }else{
            resp.sendRedirect("fail.jsp");
        }

    }
}

🎈解析

        这段Java代码定义了一个名为 UpdateFoodServlet 的Servlet类,用于处理餐品信息更新的请求:

  1. 包声明:

    • package com.dingcan.controller;: 声明了这个类属于 com.dingcan.controller 包。
  2. 导入服务类:

    • 导入了 FoodService 接口及其实现类 FoodServiceImpl
  3. @WebServlet 注解:

    • @WebServlet (name = "UpdateFoodServlet", value = "/updateFoodServlet"): 注解用于注册Servlet,定义了它的名称和URL映射。当访问 /updateFoodServlet 路径时,这个Servlet会被调用。
  4. 类定义:

    • public class UpdateFoodServlet extends HttpServlet: 定义了一个名为 UpdateFoodServlet 的类,它继承自 HttpServlet
  5. service 方法:

    • @Override: 表示重写了父类的方法。
    • protected void service(HttpServletRequest req, HttpServletResponse resp): 这是Servlet的 service 方法,用于处理客户端的请求。
  6. 获取请求参数:

    • 从请求中获取餐品的字段,包括编号 (fid)、名称 (fname)、购买人数 (fcount)、价格 (fprice)、店铺编号 (fdianid) 和状态 (fstate),并将字符串转换为相应的数据类型。
  7. 创建服务实例:

    • FoodService foodService = new FoodServiceImpl();: 创建 FoodService 接口的实现类 FoodServiceImpl 的实例。
  8. 更新数据库:

    • boolean b = foodService.updateFood(fid, fname, fcount, fprice, fdianid, fstate);: 调用 foodService 的 updateFood 方法尝试根据提供的参数更新餐品信息。
  9. 重定向:

    • 如果更新成功 (b 为 true),则使用 resp.sendRedirect("showFoodServlet") 重定向到 showFoodServlet
    • 如果更新失败 (b 为 false),则使用 resp.sendRedirect("fail.jsp") 重定向到错误页面。
  10. 异常处理:

    • 方法声明中包含了 throws ServletException, IOException,表示这个方法可能会抛出 ServletException 和 IOException 异常。

    UpdateFoodServlet 的主要作用是接收用户提交的餐品更新信息,调用服务层方法更新数据库中的记录,并根据操作结果重定向到相应页面。这个过程中,它利用了服务层提供的业务逻辑和数据访问对象来实现数据的持久化。

🎯查询热卖餐品

😎后端处理HotFoodServlet部分

🎈代码

package com.dingcan.controller;

import cn.hutool.db.Entity;
import com.dingcan.service.FoodService;
import com.dingcan.service.Impl.FoodServiceImpl;

import javax.servlet.ServletException;
import javax.servlet.annotation.WebServlet;
import javax.servlet.http.HttpServlet;
import javax.servlet.http.HttpServletRequest;
import javax.servlet.http.HttpServletResponse;
import java.io.IOException;
import java.util.List;

@WebServlet(name = "HotFoodServlet", value = "/hotFoodServlet")
public class HotFoodServlet extends HttpServlet {
    FoodService foodService=new FoodServiceImpl();
    @Override
    protected void service(HttpServletRequest req, HttpServletResponse resp) throws ServletException, IOException {
        int sid1=(int)req.getSession().getAttribute("sid1");
        //查询所有属于商家自己的并且购买人数大于50的餐品
        String sql="select * from food,shangjia,dianpu where food.`fdianid`=dianpu.`did` and dianpu.`did`=shangjia.`sdianid` and fcount >50 and sid="+sid1;
        List<Entity> list=foodService.findFood(sql);
        //list放到req中
        req.setAttribute("list",list);
        req.getRequestDispatcher("/s1/showFood1.jsp").forward(req,resp);
    }
}

🎈解析

        这段Java代码是一个Servlet控制器,用于检索并展示热门餐品信息:

  1. 包声明:

    • package com.dingcan.controller;: 声明了这个类属于 com.dingcan.controller 包。
  2. 导入相关类:

    • 导入了 cn.hutool.db.Entity 用于数据库操作。
    • 导入了 com.dingcan.service.FoodService 接口及其实现类 com.dingcan.service.Impl.FoodServiceImpl
  3. @WebServlet 注解:

    • @WebServlet(name = "HotFoodServlet", value = "/hotFoodServlet"): 注解用于注册Servlet,定义了它的名称和URL映射。当访问 /hotFoodServlet 路径时,这个Servlet会被调用。
  4. 类定义:

    • public class HotFoodServlet extends HttpServlet: 定义了一个名为 HotFoodServlet 的类,它继承自 HttpServlet
  5. 成员变量:

    • FoodService foodService = new FoodServiceImpl();: 创建了 FoodService 接口的实现类 FoodServiceImpl 的实例。
  6. service 方法:

    • @Override: 表示重写了父类的方法。
    • protected void service(HttpServletRequest req, HttpServletResponse resp): 这是Servlet的 service 方法,用于处理客户端的请求。
  7. 获取会话属性:

    • int sid1 = (int) req.getSession().getAttribute("sid1");: 从会话中获取商家ID (sid1)。
  8. 构建SQL查询:

    • 构建了一个SQL查询字符串,用于检索所有属于特定商家 (sid1)、并且购买人数大于50的餐品。
  9. 执行查询:

    • List<Entity> list = foodService.findFood(sql);: 使用 foodService 的 findFood 方法执行SQL查询,并将结果存储在 list 中。
  10. 设置请求属性:

    • req.setAttribute("list", list);: 将查询结果 list 设置为请求属性,这样就可以在JSP页面中通过 ${list} 访问这些数据。
  11. 请求转发:

    • req.getRequestDispatcher("/s1/showFood1.jsp").forward(req, resp);: 将请求转发到 /s1/showFood1.jsp 页面,携带请求属性。
  12. 异常处理:

    • 方法声明中包含了 throws ServletException, IOException,表示这个方法可能会抛出 ServletException 和 IOException 异常。

    HotFoodServlet 的主要作用是根据商家ID检索热门餐品(购买人数大于50),将这些餐品的信息转发到 showFood1.jsp 页面进行展示。使用 hutool 库的 Entity 类来处理数据库查询结果。这个Servlet通过转发请求到JSP页面,实现了MVC架构中的控制层功能。

🎈效果

🎯查询出售车

😎前端页面soleCar.jsp部分

🎈代码

<%--
  Created by IntelliJ IDEA.
  User: Lenovo
  Date: 21/6/2024
  Time: 上午10:38
  To change this template use File | Settings | File Templates.
--%>
<%@ page contentType="text/html;charset=UTF-8" language="java" %>
<%@ taglib prefix="c" uri="http://java.sun.com/jsp/jstl/core" %>
<html>
<head>
    <title>展示商家购物车的信息</title>
    <!-- 引入 Bootstrap -->
    <link href="https://cdn.staticfile.org/twitter-bootstrap/3.3.7/css/bootstrap.min.css" rel="stylesheet">
    <link href="css/sShow.css" rel="stylesheet">
</head>
<body>
<div class="first">
    <div class="one">
        <div class="two">
            <img src="image/four.jpg" alt="LOGO">
            <label>优质外卖订餐系统</label>
        </div>
        <div class="three">
            <a href="exitServlet" class="btn">注销</a>
        </div>
    </div>
    <div class="btn-group-vertical">
        <a href="showFoodServlet" class="btn" role="button">餐品展示</a>
        <a href="s1/addFood.jsp" class="btn" role="button">添加餐品</a>
        <a href="hotFoodServlet" class="btn" role="button">热门餐品</a>
        <a href="showCarServlet" class="btn" role="button">出售车</a>
    </div>
    <div class="four">
        <table  class="table table-striped table-bordered table-condensed">
            <thead>
            <tr class="danger">
                <td>餐名</td>
                <td>价格</td>
                <td>状态</td>
                <td>用户编号</td>
                <td>操作</td>
            </tr>
            </thead>
            <tbody>
            <c:forEach items="${list}" var="car">
                <tr class="success">
                    <td>${car.cname}</td>
                    <td>${car.cprice}</td>
                    <td>${car.cstate == 1 ? "发货中" : "未发货"}</td>
                    <td>${car.cuid}</td>
                    <td>
                        <a href="sendCarServlet?cid=${car.cid}" class="btn btn-primary">发货</a>
                    </td>
                </tr>
            </c:forEach>
            </tbody>

        </table>
    </div>
</div>
</body>
</html>

🎈解析

        这段代码是一个JSP页面,用于展示商家购物车中的商品信息:

  1. JSP注释:

    • 页面顶部的注释由IntelliJ IDEA自动生成,提供了创建者、日期和时间。
  2. 页面指令:

    • <%@ page contentType="text/html;charset=UTF-8" language="java" %>: 设置页面的MIME类型为HTML,字符集为UTF-8,脚本语言为Java。
    • <%@ taglib prefix="c" uri="http://java.sun.com/jsp/jstl/core" %>: 引入JSTL核心库,使用c作为前缀。
  3. HTML结构:

    • <html>: 根元素。
    • <head>: 包含页面的元数据,如标题和样式链接。
    • <title>: 页面标题为“展示商家购物车的信息”。
  4. Bootstrap和自定义CSS:

    • <link href="https://cdn.staticfile.org/twitter-bootstrap/3.3.7/css/bootstrap.min.css" rel="stylesheet">: 引入Bootstrap的CSS文件,用于页面样式。
    • <link href="css/sShow.css" rel="stylesheet">: 引入自定义的CSS样式文件。
  5. 页面内容:

    • <div class="first">: 包含整个页面的主要内容。
    • <div class="one">: 包含LOGO和系统名称。
    • <div class="two">: 包含LOGO图片和系统名称标签。
    • <div class="three">: 包含注销按钮,链接到exitServlet
  6. 导航菜单:

    • <div class="btn-group-vertical">: 垂直排列的按钮组,包含不同功能的链接。
  7. 表格展示:

    • <table class="table table-striped table-bordered table-condensed">: 使用Bootstrap样式的表格,展示购物车中的商品信息。
    • <thead>: 表格的头部,包含列标题。
    • <tbody>: 表格的主体,使用JSTL的<c:forEach>标签循环遍历list集合。
  8. JSTL标签:

    • <c:forEach items="${list}" var="car">: 用于遍历作为请求属性传递到页面的list集合。
  9. 表格行:

    • <tr>: 表格的一行,用于显示单个商品的信息。
    • <td>: 表格单元格,显示商品的名称(car.cname)、价格(car.cprice)、状态、用户编号(car.cuid)。
  10. 操作链接:

    • <a href="sendCarServlet?cid=${car.cid}" class="btn btn-primary">发货</a>: 在操作列中,创建一个链接到sendCarServlet的按钮,用于处理商品的发货操作。
  11. 状态显示:

    • ${car.cstate == 1 ? "发货中" : "未发货"}: 使用JSP表达式来显示商品的当前状态。
  12. Bootstrap类:

    • 页面使用了Bootstrap的类(如btnbtn-primarytable-stripedtable-borderedtable-condenseddangersuccess)来增强表单的布局和样式。

        这个JSP页面提供了一个商家购物车信息展示的用户界面,允许商家查看商品信息,并提供了发货操作的链接。使用Bootstrap框架增强了用户界面的友好性和响应性。

🎈效果

😎后端处理部分

🎈代码

package com.dingcan.controller;

import cn.hutool.db.Entity;
import com.dingcan.service.CarService;
import com.dingcan.service.Impl.CarServiceImpl;

import javax.servlet.ServletException;
import javax.servlet.annotation.WebServlet;
import javax.servlet.http.HttpServlet;
import javax.servlet.http.HttpServletRequest;
import javax.servlet.http.HttpServletResponse;
import java.io.IOException;
import java.util.List;

@WebServlet(name = "ShowCarServlet", value = "/showCarServlet")
public class ShowCarServlet extends HttpServlet {
    CarService carService=new CarServiceImpl();
    @Override
    protected void service(HttpServletRequest req, HttpServletResponse resp) throws ServletException, IOException {
        int sid= (int) req.getSession().getAttribute("sid1");
        List<Entity> list=carService.sFindCar(sid);
        if (list!=null) {
            req.setAttribute("list", list);
            req.getRequestDispatcher("/s1/soleCar.jsp").forward(req, resp);
        }
    }
}

🎈解析

        这段Java代码是一个Servlet控制器,用于展示商家购物车中的商品信息:

  1. 包声明:

    • package com.dingcan.controller;: 声明了这个类属于 com.dingcan.controller 包。
  2. 导入相关类:

    • 导入了 cn.hutool.db.Entity 用于数据库操作。
    • 导入了 com.dingcan.service.CarService 接口及其实现类 com.dingcan.service.Impl.CarServiceImpl
  3. @WebServlet 注解:

    • @WebServlet(name = "ShowCarServlet", value = "/showCarServlet"): 注解用于注册Servlet,定义了它的名称和URL映射。当访问 /showCarServlet 路径时,这个Servlet会被调用。
  4. 类定义:

    • public class ShowCarServlet extends HttpServlet: 定义了一个名为 ShowCarServlet 的类,它继承自 HttpServlet
  5. 成员变量:

    • CarService carService = new CarServiceImpl();: 创建了 CarService 接口的实现类 CarServiceImpl 的实例。
  6. service 方法:

    • @Override: 表示重写了父类的方法。
    • protected void service(HttpServletRequest req, HttpServletResponse resp): 这是Servlet的 service 方法,用于处理客户端的请求。
  7. 获取会话属性:

    • int sid = (int) req.getSession().getAttribute("sid1");: 从会话中获取商家ID (sid1)。
  8. 查询数据库:

    • List<Entity> list = carService.sFindCar(sid);: 使用 carService 的 sFindCar 方法根据商家ID查询购物车中的商品信息。
  9. 检查查询结果:

    • if (list != null): 检查查询结果是否不为空。
  10. 设置请求属性:

    • req.setAttribute("list", list);: 将查询结果 list 设置为请求属性,这样就可以在JSP页面中通过 ${list} 访问这些数据。
  11. 请求转发:

    • req.getRequestDispatcher("/s1/soleCar.jsp").forward(req, resp);: 将请求转发到 /s1/soleCar.jsp 页面,携带请求属性。
  12. 异常处理:

    • 方法声明中包含了 throws ServletException, IOException,表示这个方法可能会抛出 ServletException 和 IOException 异常。

    ShowCarServlet 的主要作用是根据商家ID检索购物车中的商品信息,并将这些信息转发到 soleCar.jsp 页面进行展示。如果查询结果为空,则可能不会执行转发,这意味着在 soleCar.jsp 页面中需要对 list 可能为 null 的情况进行处理。使用 hutool 库的 Entity 类来处理数据库查询结果。这个Servlet通过转发请求到JSP页面,实现了MVC架构中的控制层功能。

🎯进行发货操作

😎后端处理 SendCarServlet部分

🎈代码

package com.dingcan.controller;

import com.dingcan.service.CarService;
import com.dingcan.service.Impl.CarServiceImpl;

import javax.servlet.ServletException;
import javax.servlet.annotation.WebServlet;
import javax.servlet.http.HttpServlet;
import javax.servlet.http.HttpServletRequest;
import javax.servlet.http.HttpServletResponse;
import java.io.IOException;

@WebServlet(name = "SendCarServlet", value = "/sendCarServlet")
public class SendCarServlet extends HttpServlet {
    CarService carService=new CarServiceImpl();
    @Override
    protected void service(HttpServletRequest req, HttpServletResponse resp) throws ServletException, IOException {
        int cid=Integer.parseInt(req.getParameter("cid"));
        if(carService.updateCar(cid,1))
        {
            resp.sendRedirect("showCarServlet");
        }
    }
}

🎈解析

        这段Java代码是一个Servlet控制器,用于处理将商品标记为已发货的请求:

  1. 包声明:

    • package com.dingcan.controller;: 声明了这个类属于 com.dingcan.controller 包。
  2. 导入服务类:

    • 导入了 com.dingcan.service.CarService 接口及其实现类 com.dingcan.service.Impl.CarServiceImpl
  3. @WebServlet 注解:

    • @WebServlet(name = "SendCarServlet", value = "/sendCarServlet"): 注解用于注册Servlet,定义了它的名称和URL映射。当访问 /sendCarServlet 路径时,这个Servlet会被调用。
  4. 类定义:

    • public class SendCarServlet extends HttpServlet: 定义了一个名为 SendCarServlet 的类,它继承自 HttpServlet
  5. 成员变量:

    • CarService carService = new CarServiceImpl();: 创建了 CarService 接口的实现类 CarServiceImpl 的实例。
  6. service 方法:

    • @Override: 表示重写了父类的方法。
    • protected void service(HttpServletRequest req, HttpServletResponse resp): 这是Servlet的 service 方法,用于处理客户端的请求。
  7. 获取请求参数:

    • int cid = Integer.parseInt(req.getParameter("cid"));: 从请求中获取 cid 参数,即商品的唯一标识符,并转换为整数类型。
  8. 更新商品状态:

    • if (carService.updateCar(cid, 1)): 使用 carService 的 updateCar 方法尝试将商品ID为 cid 的商品状态更新为已发货(通常状态码1表示已发货)。
  9. 重定向:

    • 如果更新成功,使用 resp.sendRedirect("showCarServlet") 重定向到 showCarServlet,这将展示更新后的商品列表。
  10. 异常处理:

    • 方法声明中包含了 throws ServletException, IOException,表示这个方法可能会抛出 ServletException 和 IOException 异常。

    SendCarServlet 的主要作用是接收商品ID,调用服务层方法更新商品的发货状态,并根据操作结果重定向到商品列表页面。这个过程中,它利用了服务层提供的业务逻辑和数据访问对象来实现数据的持久化。如果更新失败,代码中没有直接处理,可能需要添加额外的逻辑来处理这种情况(例如重定向到错误页面或显示错误消息)。

🎈效果

【版权声明】本文为华为云社区用户原创内容,转载时必须标注文章的来源(华为云社区)、文章链接、文章作者等基本信息, 否则作者和本社区有权追究责任。如果您发现本社区中有涉嫌抄袭的内容,欢迎发送邮件进行举报,并提供相关证据,一经查实,本社区将立刻删除涉嫌侵权内容,举报邮箱: cloudbbs@huaweicloud.com
  • 点赞
  • 收藏
  • 关注作者

评论(0

0/1000
抱歉,系统识别当前为高风险访问,暂不支持该操作

全部回复

上滑加载中

设置昵称

在此一键设置昵称,即可参与社区互动!

*长度不超过10个汉字或20个英文字符,设置后3个月内不可修改。

*长度不超过10个汉字或20个英文字符,设置后3个月内不可修改。