好好编程-物流项目07【SpringMVC整合】
SpringMVC整合
1.配置文件
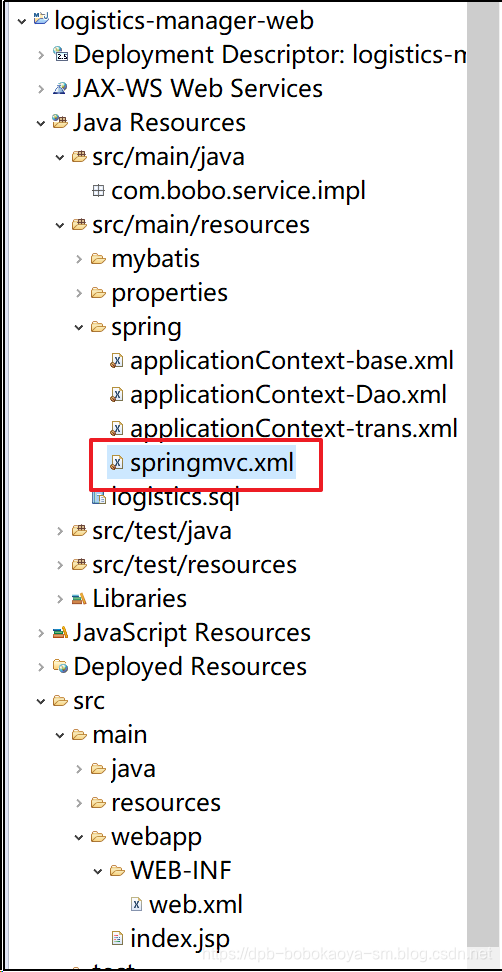
在logistics-manager-web工程的src/main/resource目录下的spring文件夹中新建一个springmvc.xml文件。

springmvc中配置文件的内容为
<?xml version="1.0" encoding="UTF-8"?>
<beans xmlns="http://www.springframework.org/schema/beans"
	xmlns:xsi="http://www.w3.org/2001/XMLSchema-instance" xmlns:context="http://www.springframework.org/schema/context"
	xmlns:mvc="http://www.springframework.org/schema/mvc"
	xsi:schemaLocation="http://www.springframework.org/schema/beans http://www.springframework.org/schema/beans/spring-beans.xsd http://www.springframework.org/schema/context http://www.springframework.org/schema/context/spring-context.xsd http://www.springframework.org/schema/mvc http://www.springframework.org/schema/mvc/spring-mvc.xsd">
	 <!-- SpringMVC容器只扫描Controller -->
	<context:component-scan base-package="com.bobo"
		use-default-filters="false">
		<context:include-filter type="annotation"
			expression="org.springframework.stereotype.Controller" />
	</context:component-scan>
	<!-- 配置注解驱动 -->
	<mvc:annotation-driven />
	<!-- 视图解析器 -->
	<bean
		class="org.springframework.web.servlet.view.InternalResourceViewResolver">
		<property name="prefix" value="/WEB-INF/jsp/" />
		<property name="suffix" value=".jsp" />
	</bean>
</beans>
- 1
- 2
- 3
- 4
- 5
- 6
- 7
- 8
- 9
- 10
- 11
- 12
- 13
- 14
- 15
- 16
- 17
- 18
- 19
- 20
创建对应的package

2.配置前端控制器
web.xml文件配置内容如下,其中前端控制器配置中1这句话的意思是tomcat启动之后便加载DispatcherServlet,如果不配置的话,需要等请求访问的时候才会加载DispatcherServlet。另外可以看到,我们并没有配置父容器(ContextLoaderListener),这是因为我们在taotao-manager工程中已经配置过了,而且配置了Dao和Service。因此我们表现层不需要再配置一遍父容器了。
<?xml version="1.0" encoding="UTF-8"?>
<web-app version="2.5" id="WebApp_ID" xmlns="http://java.sun.com/xml/ns/javaee"
	xmlns:xsi="http://www.w3.org/2001/XMLSchema-instance"
	xsi:schemaLocation="http://java.sun.com/xml/ns/javaee
 http://java.sun.com/xml/ns/javaee/web-app_2_5.xsd">
	<display-name>taotao-manager</display-name>
	<welcome-file-list>
		<welcome-file>index.jsp</welcome-file>
	</welcome-file-list>

	<!-- 初始化spring容器 -->
	<context-param>
		<param-name>contextConfigLocation</param-name>
		<param-value>classpath:spring/applicationContext-*.xml</param-value>
	</context-param>
	<listener>
		<listener-class>org.springframework.web.context.ContextLoaderListener</listener-class>
	</listener>

	<!-- post乱码过滤器 -->
	<filter>
		<filter-name>CharacterEncodingFilter</filter-name>
		<filter-class>org.springframework.web.filter.CharacterEncodingFilter</filter-class>
		<init-param>
			<param-name>encoding</param-name>
			<param-value>utf-8</param-value>
		</init-param>
	</filter>
	<filter-mapping>
		<filter-name>CharacterEncodingFilter</filter-name>
		<url-pattern>/*</url-pattern>
	</filter-mapping>
	<!-- 前端控制器 -->
	<servlet>
		<servlet-name>taotao-manager-web</servlet-name>
		<servlet-class>org.springframework.web.servlet.DispatcherServlet</servlet-class>
		<!-- contextConfigLocation不是必须的, 如果不配置contextConfigLocation, springmvc的配置文件默认在:WEB-INF/servlet的name+"-servlet.xml" -->
		<init-param>
			<param-name>contextConfigLocation</param-name>
			<param-value>classpath:spring/springmvc.xml</param-value>
		</init-param>
		<load-on-startup>1</load-on-startup>
	</servlet>
	<servlet-mapping>
		<servlet-name>taotao-manager-web</servlet-name>
		<!-- 拦截所有请求jsp除外 -->
		<url-pattern>/</url-pattern>
	</servlet-mapping>

</web-app>
- 1
- 2
- 3
- 4
- 5
- 6
- 7
- 8
- 9
- 10
- 11
- 12
- 13
- 14
- 15
- 16
- 17
- 18
- 19
- 20
- 21
- 22
- 23
- 24
- 25
- 26
- 27
- 28
- 29
- 30
- 31
- 32
- 33
- 34
- 35
- 36
- 37
- 38
- 39
- 40
- 41
- 42
- 43
- 44
- 45
- 46
- 47
- 48
- 49
- 50
3.父子容器
&esmp; 学过Spring和SpringMVC的都知道SpringMVC其实是Spring容器的一个子容器,在我们的配置中,Spring父容器配置的是Dao层和Service层,而Spring子容器配置的是Controller层,子容器可以访问父容器中的对象,但是父容器无法访问子容器中的对象,也就是现在配置的controller可以把Dao和Service的对象注入进来,但是Dao和Service无法把Controller注入进来

注意:子容器其实也可以完全当父容器使用,之所以搞出父子容器,是为了让父容器有更好的扩展性,子容器只需要消费父容器就可以了。
文章来源: dpb-bobokaoya-sm.blog.csdn.net,作者:波波烤鸭,版权归原作者所有,如需转载,请联系作者。
原文链接:dpb-bobokaoya-sm.blog.csdn.net/article/details/88672595
- 点赞
- 收藏
- 关注作者


评论(0)