HarmonyOS(鸿蒙)——Text(文本)组件介绍
一、简介
Text是用来显示字符串的组件,在界面上显示为一块文本区域。Text作为一个基本组件,有很多扩展,常见的有按钮组件Button,文本编辑组件TextField。
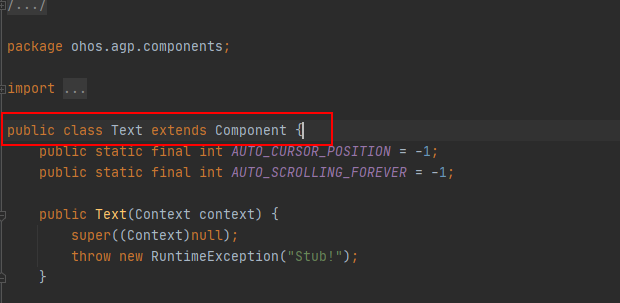
Text组件继承自Componet。

华为官方学习地址:
二、属性
Text组件支持的属性比较多,但是由于其非常重要,因此每个属性我会根据官网文档一一实现。
2.1 text
| 属性名称 |
中文描述 |
取值 |
取值说明 |
使用案例 |
| text |
显示文本 |
string类型 |
可以直接设置文本字串,也可以引用string资源(推荐使用)。 |
ohos:text="熄屏时间" ohos:text="$string:test_str" |
代码演示:
 <Text
       ohos:id="$+id:text"
       ohos:height="match_content"
       ohos:width="match_content"
ohos:text="李子捌"/>显示效果:

2.2 text_size
| 属性名称 |
中文描述 |
取值 |
取值说明 |
使用案例 |
| text_size |
文本大小
|
float类型 |
表示字体大小的float类型。 可以是浮点数值,其默认单位为px;也可以是带px/vp/fp单位的浮点数值;也可以引用float资源。 |
ohos:text_size="30" ohos:text_size="16fp" ohos:text_size="$float:size_value" |
代码演示:
 <Text
       ohos:id="$+id:text"
       ohos:height="match_content"
       ohos:width="match_content"
       ohos:text="150px"
ohos:text_size="150px"/>显示效果:


2.3 text_color
| 属性名称 |
中文描述 |
取值 |
取值说明 |
使用案例 |
| text_color |
文本颜色 |
color类型 |
可以直接设置色值,也可以引用color资源。 |
ohos:text_color="#A8FFFFFF" ohos:text_color="$color:black" |
代码演示:
<Text
      ohos:id="$+id:text"
      ohos:height="match_content"
      ohos:width="match_content"
      ohos:text="blue"
      ohos:text_size="100px"
      ohos:text_color="blue"
      />
演示效果:

使用HEX效果:

2.4 text_font
| 属性名称 |
中文描述 |
取值 |
取值说明 |
使用案例 |
| text_font |
字体
|
sans-serif |
可以设置的字体如表中所列。 |
ohos:text_font="HwChinese-medium" |
| sans-serif-medium |
||||
| HwChinese-medium |
||||
| sans-serif-condensed |
||||
| sans-serif-condensed-medium |
||||
| monospace |
代码演示:
<Text
      ohos:id="$+id:text"
      ohos:height="match_content"
      ohos:width="match_content"
      ohos:text="李子捌"
      ohos:text_size="100px"
      ohos:text_color="#000000"
      ohos:text_font="HwChinese-medium"
      />
演示效果:

2.5 italic
| 属性名称 |
中文描述 |
取值 |
取值说明 |
使用案例 |
| italic |
文本是否斜体字体 |
boolean类型 |
可以直接设置true/false,也可以引用boolean资源。 |
ohos:italic="true" ohos:italic="$boolean:true" |
代码演示:
<Text
      ohos:id="$+id:text"
      ohos:height="match_content"
      ohos:width="match_content"
      ohos:text="李子捌"
      ohos:text_size="100px"
      ohos:text_color="#000000"
      ohos:text_font="sans-serif"
      ohos:italic="true"
      />
演示效果:

2.6 text_weight
| 属性名称 |
中文描述 |
取值 |
取值说明 |
使用案例 |
| text_weight |
字重 |
integer类型 |
表示字体大小的integer类型。也可以引用integer资源。 |
ohos:text_weight="100" ohos:text_weight="$integer:100" |
代码演示:
    <Text
        ohos:id="$+id:text"
        ohos:height="match_content"
        ohos:width="match_content"
        ohos:text="Liziba"
        ohos:text_size="100px"
        ohos:text_color="#0000FF"
        ohos:text_font="serif"
        ohos:italic="true"
        ohos:text_weight="100"
        />
演示效果:
text_weight = 100

text_weight = 600

2.7 background_element
常用的背景如常见的文本背景、按钮背景,可以采用XML格式放置在graphic目录下。
在Project窗口,打开“entry > src > main > resources > base”,右键点击“graphic”文件夹,选择“New > File”,命名为“background_text.xml”,在background_text.xml中定义文本的背景。
代码演示:
<?xml version="1.0" encoding="UTF-8" ?>
<shape xmlns:ohos="http://schemas.huawei.cn/res/ohos"
       ohos:shape="rectangle">

    <!--设置圆角弧度-->
    <corners ohos:radius="20px"/>
    <!--设置背景色-->
    <solid ohos:color="#878787"/>

</shape>
演示效果:

2.8 text_alignment
| 属性名称 |
中文描述 |
取值 |
取值说明 |
使用案例 |
| text_alignment |
文本对齐方式 |
left |
表示文本靠左对齐。 |
可以设置取值项如表中所列,也可以使用“|”进行多项组合。 ohos:text_alignment="top" ohos:text_alignment="top|left" |
| top |
表示文本靠顶部对齐。 |
|||
| right |
表示文本靠右对齐。 |
|||
| bottom |
表示文本靠底部对齐。 |
|||
| horizontal_center |
表示文本水平居中对齐。 |
|||
| vertical_center |
表示文本垂直居中对齐。 |
|||
| center |
表示文本居中对齐。 |
|||
| start |
表示文本靠起始端对齐。 |
|||
| end |
表示文本靠结尾端对齐。 |
代码演示:
<!-- 结合width和height可以很方便的查看text_alignment的效果 -->
<Text
      ohos:id="$+id:text"
      ohos:width="300vp"
      ohos:height="100vp"
      ohos:text="Liziba"
      ohos:text_size="100px"
      ohos:text_color="#0000FF"
      ohos:text_font="serif"
      ohos:italic="true"
      ohos:text_weight="100"
      ohos:left_margin="15vp"
      ohos:bottom_margin="15vp"
      ohos:right_padding="15vp"
      ohos:left_padding="15vp"
      ohos:text_alignment="bottom|horizontal_center"
      ohos:background_element="$graphic:background_text"
      />
演示效果:

2.9 multiple_lines
| 属性名称 |
中文描述 |
取值 |
取值说明 |
使用案例 |
| multiple_lines |
多行模式设置 |
boolean类型 |
可以直接设置true/false,也可以引用boolean资源。 |
ohos:multiple_lines="true" ohos:multiple_lines="$boolean:true" |
代码演示:
<!--multiple_lines换行-->
<Text
      ohos:id="$+id:text"
      ohos:width="300px"
      ohos:height="match_content"
      ohos:text="LizibaLiziba"
      ohos:text_size="100px"
      ohos:text_color="#0000FF"
      ohos:text_font="serif"
      ohos:italic="true"
      ohos:text_weight="100"
      ohos:max_text_lines="2"
      ohos:multiple_lines="true"
      ohos:background_element="$graphic:background_text"
      />
演示效果:

2.10 max_text_lines
| 属性名称 |
中文描述 |
取值 |
取值说明 |
使用案例 |
| max_text_lines |
文本最大行数 |
integer类型 |
可以直接设置整型数值,也可以引用integer资源。 |
ohos:max_text_lines="2" ohos:max_text_lines="$integer:two" |
代码演示:
<!--
    multiple_lines 换行
    max_text_lines 最多展示行数
    LizibaLizibaLiziba 三个只展示了2行
    -->
<Text
      ohos:id="$+id:text"
      ohos:width="300px"
      ohos:height="match_content"
      ohos:text="LizibaLizibaLiziba"
      ohos:text_size="100px"
      ohos:text_color="#0000FF"
      ohos:text_font="serif"
      ohos:italic="true"
      ohos:text_weight="100"
      ohos:multiple_lines="true"
      ohos:max_text_lines="2"
      ohos:background_element="$graphic:background_text"
      />
演示效果:

2.11 auto_font_size
| 属性名称 |
中文描述 |
取值 |
取值说明 |
使用案例 |
| auto_font_size |
是否支持文本自动调整文本字体大小 |
boolean类型 |
可以直接设置true/false,也可以引用boolean资源。 |
ohos:auto_font_size="true" ohos:auto_font_size="$boolean:true" |
代码演示:
方法一:
<!--
        auto_font_size 自动调节文字大小
        max_text_lines="1" 我这里设置行数为1,就非常容易展示效果
    -->
<Text
      ohos:id="$+id:text"
      ohos:width="300px"
      ohos:height="match_content"
      ohos:text="LizibaLizibaLiziba"
      ohos:text_size="100px"
      ohos:text_color="#0000FF"
      ohos:text_font="serif"
      ohos:italic="true"
      ohos:text_weight="100"
      ohos:max_text_lines="1"
      ohos:auto_font_size="true"
      ohos:background_element="$graphic:background_text"
      />
演示效果:

方法二:
<!--
        auto_font_size 自动调节文字大小
        max_text_lines="1" 我这里设置行数为1,就非常容易展示效果
    -->
<Text
      ohos:id="$+id:text"
      ohos:width="300px"
      ohos:height="match_content"
      ohos:text="L"
      ohos:text_size="100px"
      ohos:text_color="#0000FF"
      ohos:text_font="serif"
      ohos:italic="true"
      ohos:text_weight="100"
      ohos:max_text_lines="1"
      ohos:auto_font_size="true"
      ohos:background_element="$graphic:background_text"
      />
package com.liziba.demo.slice;
import com.liziba.demo.ResourceTable;
import ohos.aafwk.ability.AbilitySlice;
import ohos.agp.components.Component;
import ohos.agp.components.Text;
public class MainAbilitySlice extends AbilitySlice {
@Override
public void onStart(Intent intent) {
super.onStart(intent);
super.setUIContent(ResourceTable.Layout_ability_main);
// 每次点击修改内容,演示字体的自动调整
Text text = (Text) this.findComponentById(ResourceTable.Id_text);
text.setClickedListener(component -> {
text.setText(text.getText() + "L");
});
}
}
演示效果:
开始点击前

连续点击后

2.12 AutoScrolling
当文本过长时,可以设置跑马灯效果,实现文本滚动显示。前提是文本换行关闭且最大显示行数为1,默认情况下即可满足前提要求。
代码演示:
<Text
      ohos:id="$+id:text"
      ohos:width="300px"
      ohos:height="match_content"
      ohos:text="LizibaLizibaLizibaLiziba"
      ohos:text_size="100px"
      ohos:text_color="#0000FF"
      ohos:text_font="serif"
      ohos:italic="true"
      ohos:text_weight="100"
      ohos:background_element="$graphic:background_text"
      />
package com.liziba.demo.slice;
import com.liziba.demo.ResourceTable;
import ohos.aafwk.ability.AbilitySlice;
import ohos.aafwk.content.Intent;
import ohos.agp.components.Component;
import ohos.agp.components.Text;
public class MainAbilitySlice extends AbilitySlice {
@Override
public void onStart(Intent intent) {
super.onStart(intent);
super.setUIContent(ResourceTable.Layout_ability_main);
Text text = (Text) this.findComponentById(ResourceTable.Id_text);
// 跑马灯效果
text.setTruncationMode(Text.TruncationMode.AUTO_SCROLLING);
// 始终处于自动滚动状态
text.setAutoScrollingCount(Text.AUTO_SCROLLING_FOREVER);
//启动跑马灯效果
text.startAutoScrolling();
}
@Override
public void onActive() {
super.onActive();
}
@Override
public void onForeground(Intent intent) {
super.onForeground(intent);
}
}演示效果:

👇🏻 关注公众号 获取更多资料👇🏻

- 点赞
- 收藏
- 关注作者


评论(0)