AS插件-Android Parcelable code generator.

【摘要】
概述
生成实现了Parcelable接口的代码的插件
下载安装
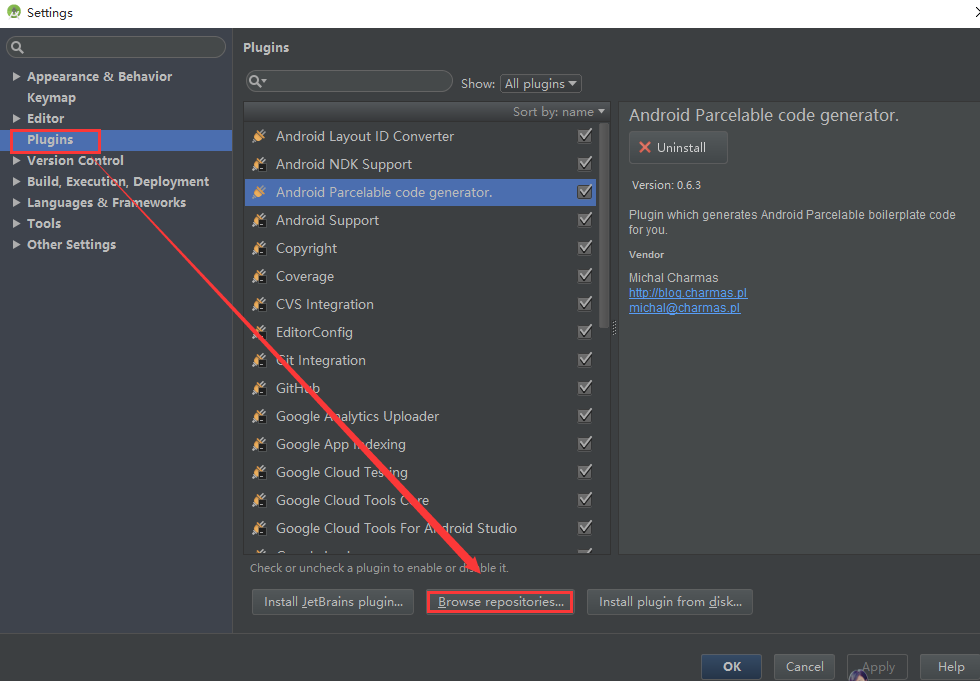
1.在线安装
输入 Android Parcelable code generator ,点击安装即可,安装之后 重启,会看到上...
概述
生成实现了Parcelable接口的代码的插件
下载安装
1.在线安装
输入 Android Parcelable code generator ,点击安装即可,安装之后 重启,会看到上图选中部分所示。
2.手动下载安装
https://github.com/mcharmas/android-parcelable-intellij-plugin
使用
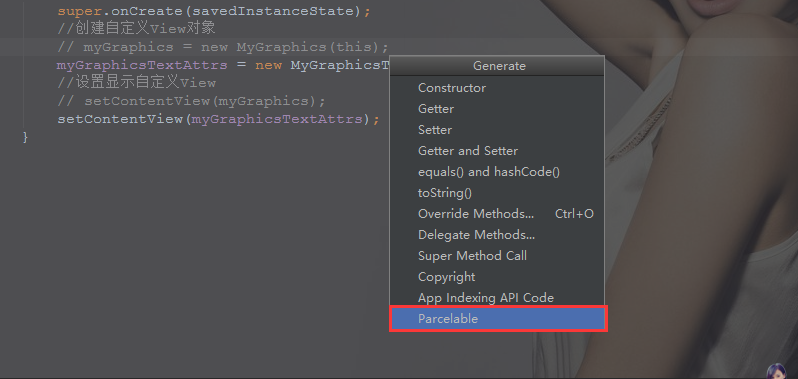
在你的类中,按下alt + insert键弹出插入代码的上下文菜单,会看到在下面有一个Parcelable,选择它之后,就会在你的类当中插入实现了Parcelable接口的代码了。
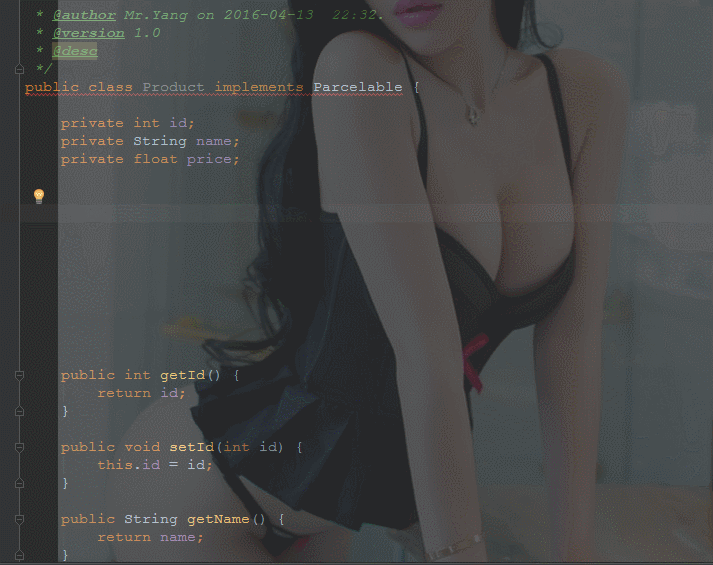
经验证,勾选Product的3个变量 和不选,生成的代码是一样的。
代码如下(setter+getter是之前已经写好了的)
package com.turing.base.activity.test;

import android.os.Parcel;
import android.os.Parcelable;

/**
 * MyApp
 *
 * @author Mr.Yang on 2016-04-13  22:32.
 * @version 1.0
 * @desc
 */
public class Product implements Parcelable {

    private int id;
    private String name;
    private float price;


    public int getId() {
        return id;
    }

    public void setId(int id) {
        this.id = id;
    }

    public String getName() {
        return name;
    }

    public void setName(String name) {
        this.name = name;
    }

    public float getPrice() {
        return price;
    }

    public void setPrice(float price) {
        this.price = price;
    }


    @Override
    public int describeContents() {
        return 0;
    }

    @Override
    public void writeToParcel(Parcel dest, int flags) {
        dest.writeInt(this.id);
        dest.writeString(this.name);
        dest.writeFloat(this.price);
    }

    public Product() {
    }

    protected Product(Parcel in) {
        this.id = in.readInt();
        this.name = in.readString();
        this.price = in.readFloat();
    }

    public static final Creator<Product> CREATOR = new Creator<Product>() {
        @Override
        public Product createFromParcel(Parcel source) {
            return new Product(source);
        }

        @Override
        public Product[] newArray(int size) {
            return new Product[size];
        }
    };
}
- 1
- 2
- 3
- 4
- 5
- 6
- 7
- 8
- 9
- 10
- 11
- 12
- 13
- 14
- 15
- 16
- 17
- 18
- 19
- 20
- 21
- 22
- 23
- 24
- 25
- 26
- 27
- 28
- 29
- 30
- 31
- 32
- 33
- 34
- 35
- 36
- 37
- 38
- 39
- 40
- 41
- 42
- 43
- 44
- 45
- 46
- 47
- 48
- 49
- 50
- 51
- 52
- 53
- 54
- 55
- 56
- 57
- 58
- 59
- 60
- 61
- 62
- 63
- 64
- 65
- 66
- 67
- 68
- 69
- 70
- 71
- 72
- 73
- 74
- 75
- 76
- 77
- 78
文章来源: artisan.blog.csdn.net,作者:小小工匠,版权归原作者所有,如需转载,请联系作者。
原文链接:artisan.blog.csdn.net/article/details/51147463

【版权声明】本文为华为云社区用户转载文章,如果您发现本社区中有涉嫌抄袭的内容,欢迎发送邮件进行举报,并提供相关证据,一经查实,本社区将立刻删除涉嫌侵权内容,举报邮箱:
cloudbbs@huaweicloud.com
- 点赞
- 收藏
- 关注作者
评论(0)